vue3和vite实现vue-router4版本路由的配置以及自动生成路由配置
这个是普通的手动路由配置:https://blog.csdn.net/weixin_68658847/article/details/130071101
自动路由配置
创建项目
js
npm create vite@latest my-vue-app -- --template vue
// 或者
yarn create vite my-vue-app --template vue
js
// 安装路由
yarn add vue-router@4.3.2
// 安装自动路径导入插件
yarn add vite-plugin-pages --dev
下面是项目结构
js
src
├─App.vue
├─main.js
├─style.css
├─views
|   ├─index.vue
|   ├─user
|   |  └[username].vue
|   ├─home
|   |  ├─index.vue
|   |  ├─iii
|   |  |  ├─[id].vue
|   |  |  ├─index.vue
|   |  |  ├─aaa
|   |  |  |  └index.vue
|   ├─about
|   |   └index.vue
├─router
|   └index.js
├─components
|     └HelloWorld.vue
├─assets
|   └vue.svg
在vite.config.js做以下配置
js
import { defineConfig } from 'vite'
import vue from '@vitejs/plugin-vue'
import Pages from 'vite-plugin-pages'
// https://vitejs.dev/config/
export default defineConfig({
  plugins: [vue(),Pages({
    // 这里可以配置插件选项,例如路由的目录等,这里我指定了遍历的文件夹是src/view目录
    dirs: [{ dir: 'src/views', baseRoute: '' }],
  }),],
})
在src/router/index.js下面做以下配置
js
import { createRouter, createWebHistory } from 'vue-router'
import routes from 'virtual:generated-pages'
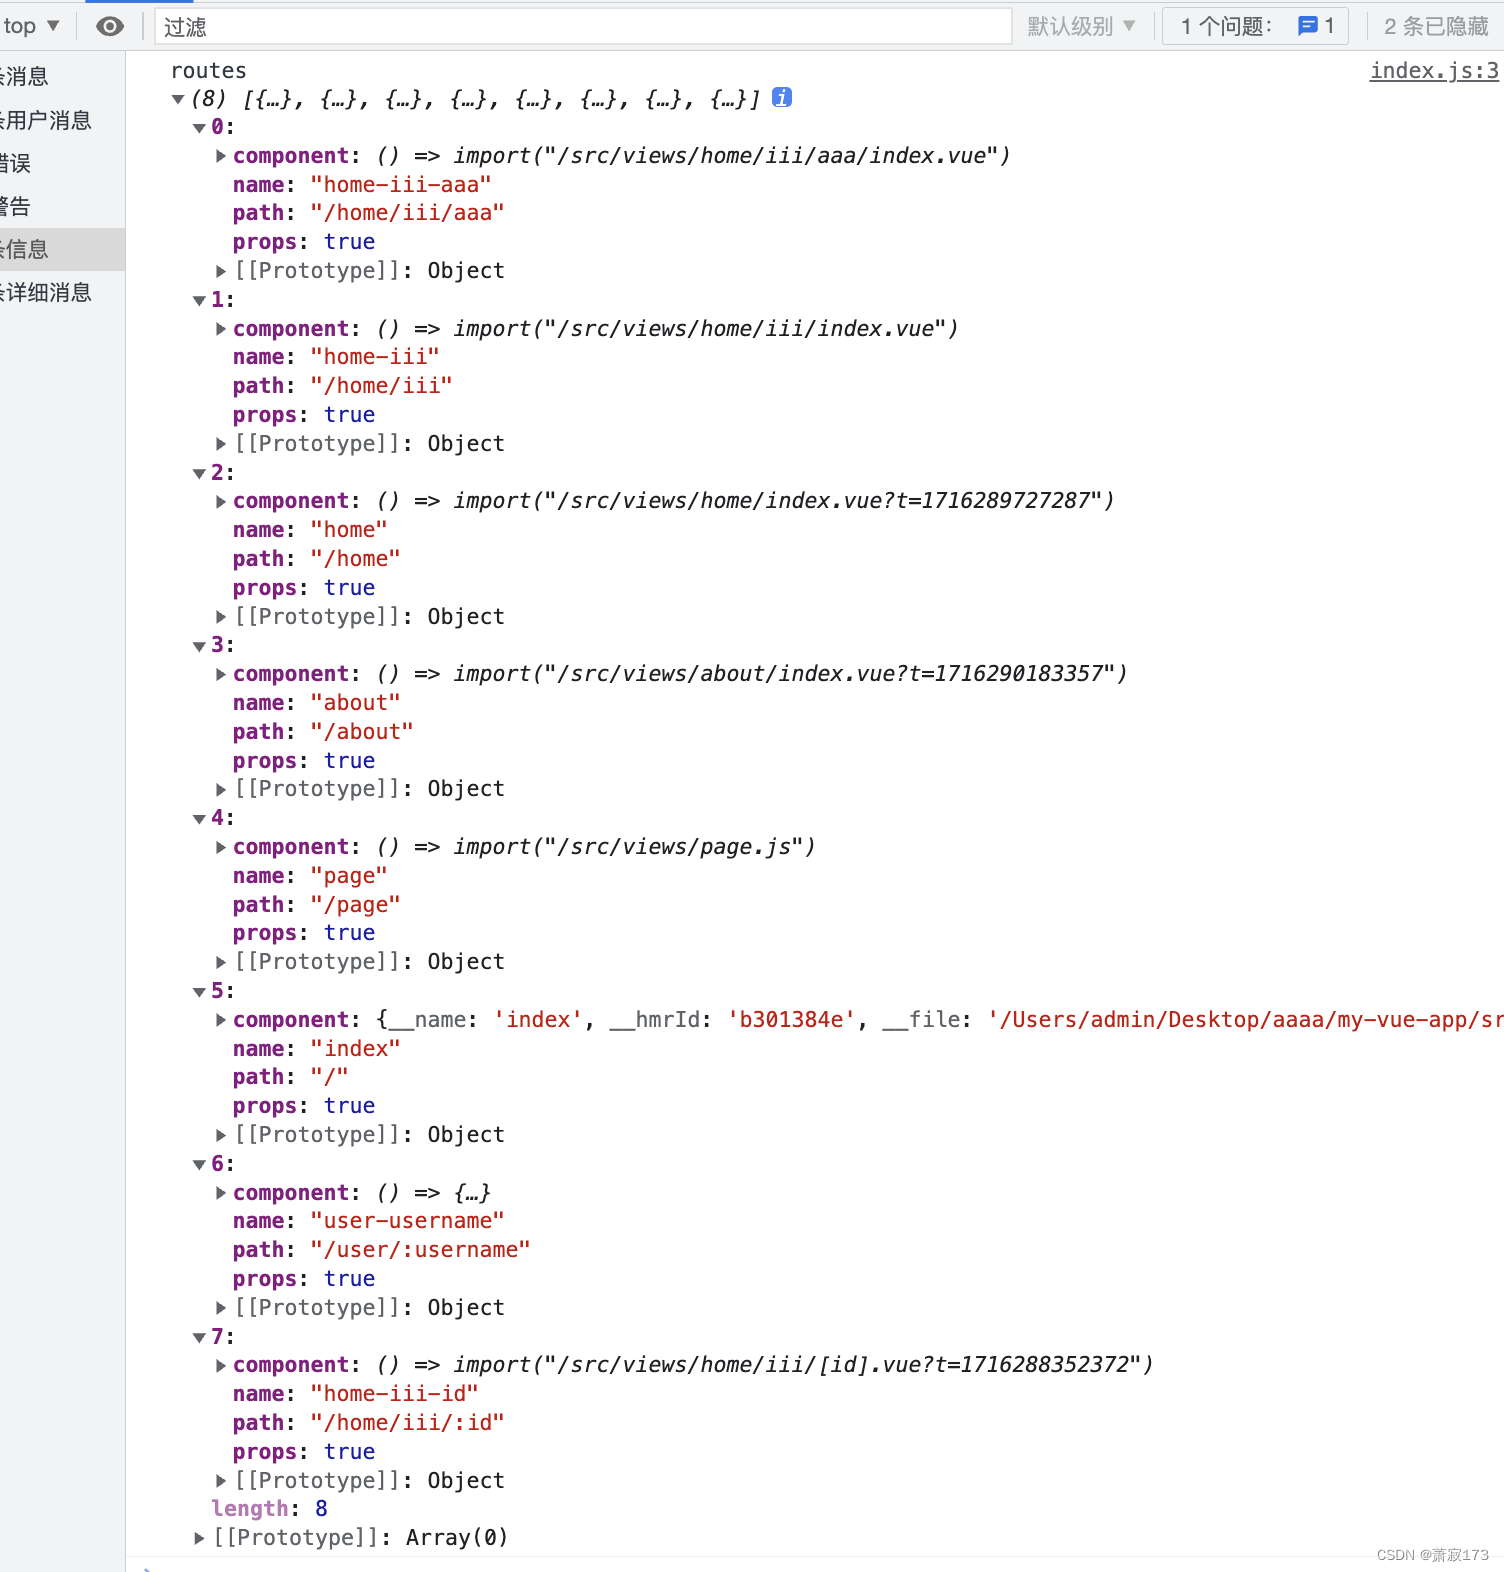
console.log('routes',routes); // 这里打印的路由信息我粘贴到下面了
const router = createRouter({
  history: createWebHistory(),
  routes,
})

export default router
在main.js配置一下
js
import { createApp } from 'vue'
import App from './App.vue'
import router from "/src/router/index.js";

createApp(App)
.use(router)
.mount('#app')
App.vue使用
js
<script setup>
//演示一种,其他跳转一样
import { useRouter,useRoute } from "vue-router";
const router = useRouter();
const xj = () => {
  // router.push({
  //   name: "about",  // 第一种方式:根据name进行跳转
  //   query: {
  //     id: '0234567',  // 参数
  //   },
  // });

  router.push({
    path:'/user/1232' // 第二种方式:根据动态路由进行跳转,后面的1232就是参数
  });
}


// 其他页面接受参数
// const route = useRoute();
// console.log(route.query.id)  // 接收第一种name值传参的参数

// // 获取地址栏的参数
// console.log("route", route.params.username); // 接收第二种动态路由传参数的参数
</script>

<template>
  <button @click="xj">点击跳转</button>
  <router-view></router-view>
</template>

<style scoped>

</style>
上面的routers的打印数据如下 可以发现是以文件夹的名称进行匹配的, 例如
- 如果下面有index.vue文件夹则就是当前目标页面,home/index.vue文件路径就是/home,
- 如果某个文件夹下面起的名字不是index.vue则会将此文件名当路由,如/home/homeItem.vue则路由就是/home/homeItem
- 动态路由的参考上面可以发现文件命名[username]就相当于是在路由后面动态拼接一个路径,例如user/[username]则路由为/user/:username
配置404页面
在src/views文件夹下面新建[...all].vue,这个就是404页面了,当匹配不到页面时会自动使用这个页面的样式
js
<template>
    404
</template>
配置meta等敏感信息
找到vite.config.js,添加如下代码
js
import { defineConfig } from 'vite'
import vue from '@vitejs/plugin-vue'
import Pages from 'vite-plugin-pages'
export default defineConfig({
  base: './', // 打包的静态资源引用路径
  plugins: [vue(),Pages({
    // 这里可以配置插件选项,例如路由的目录等,这里我指定了遍历的文件夹是src/view目录
    dirs: [{ dir: 'src/views', baseRoute: '' }],
    extendRoute(route, parent) {
      // 这里找到博客上面的src/router/index.js这个文件夹里面的打印,这里是打印了所有的路由,例如想开启某些页面的权限,如登录才能访问,但是也有一些特定页面无需登录即可访问,则可以从打印信息里面找到这个页面的path进行判断,直接返回,需要加权限的可以通过...route去写,示例如下:
      if (route.path === '/:shop_id/confirmpassword') {
        return route
      }
      // 404页面不加权限
      if(route.name == 'all'){
        return route
      }
      // 其他页面都加权限
      return {
        ...route,
        meta: { auth: true },
      }
    },
  }),],
  resolve: {
    alias: {
      '@': '/src' // 配置@/提示符
    }
  },
})
路由导航
这里写个前置导航,模拟下登录案例找到src/router/index.js里面替换如下
js
import { createRouter, createWebHistory } from 'vue-router'
import routes from 'virtual:generated-pages'

// 这里我用一下pinia记录一下用户当前访问的路由信息,方便校验完成之后,跳转到指定页面
import {xj} from "@/store/store.js"


console.log('routes', routes); // 这里打印的路由信息我粘贴到下面了
const router = createRouter({
  history: createWebHistory(),
  routes,
})


// 路由守卫
router.beforeEach((to, from, next) => {
  // 获取一下本地token
  const token = localStorage.getItem('captchaValue');
  // 获取页面权限
  const auth = to.meta.auth;  //  这个meta是我在vite.config.js中配置的,具体看上面的博客代码
  const store = xj();
  if (auth) {
    // 如果页面需要权限,判断是否有token
    if (token) {
      // 有token,放行
      next()
    } else {
      // 没有token,跳转到指定页面
      store.route_url = to.path; // 存储用户当前访问地址路由信息,方便校验成功之后,跳转到指定页面
      // 下面这个也可以用name,如果没有动态参数的话建议name
      next({ path: '/' + to.params.shop_id + '/confirmpassword' })
    }
  } else {
    next()
  }

});
export default router